3. Sprite Hit Testing
A very common requirement for games will be to tell
whether the player has touched one of the objects onscreen. We know
where the objects all are and we know the point that the user has
touched, so how can we tell if they coincide?
There are several approaches that we can use, each
with different characteristics. Some of the different mechanisms that
can be used are the following:
Checking against the sprite bounding box.
Rectangular hit tests are similar to
the bounding box test but properly take the sprite rotation into
account. This test requires a little more calculation, but can
accurately reflect whether the point falls within the rendered sprite
rectangle.
Elliptical hit tests are good
for sprites whose shape is essentially round. They perform a test by
finding the distance from the touch point to the center of the sprite
and checking whether this is within the area of the ellipse.
Let's see how each of these approaches can be implemented.
3.1. Bounding Box Hit Tests
The easiest but least flexible mechanism for
detecting whether a sprite has been touched is to see whether the
sprite's bounding box contains the touch point. This can be achieved as
shown in Listing 6.
Example 6. A simple hit test using the bounding box
bool IsPointInObject (Vector2 point)
    {
        Rectangle bbox;

        // Retrieve the bounding box
        bbox = BoundingBox;

        // See whether the box contains the point
        return bbox.Contains((int)point.X, (int)point.Y);
    }
|
The Rectangle structure conveniently
performs this check for us, though it is really just a simple matter of
checking that the x coordinate falls between the rectangle's left and
right edges, and that the y coordinate falls between the top and bottom
edges.
As the BoundingBox property already takes
notice of scaling and custom sprite origins, this is all that we need to
do for this simple check. If we need to be able to work with rotated
rectangles, though, we need something a little more sophisticated...
3.2. Rectangular Hit Tests
There are various ways that we could test a point
within a rotated rectangle. The easiest to conceptualize is taking the
four corners of the rectangle and seeing whether the point falls inside
them. However, there are simpler and more efficient ways to achieve this
in code.
A more efficient way to achieve this is to imagine
that we have rotated the rectangle back around its origin until its
angle is zero, and correspondingly rotate the test point by the same
angle. Once we have done this, we can simply perform a simple aligned
rectangle check, just as we did in Listing 6.
In Figure 2,
two images are shown of some test points and a rectangle. The rectangle
has been scaled so that it is longer along its x axis, and rotated by
about 15 degrees. Looking at Figure 2(a),
it is obvious visually that test point 1 is within the rectangle, and
test point 2 is not. In order for our code to determine this, we imagine
rotating the sprite back until its angle is 0, and we rotate the two
points by exactly the same amount. Of course, we don't actually draw it
like this or even update the sprite's properties; we just perform the
calculations that would be required for this rotation. If we were to draw the rotation, we would end up with the arrangement shown in Figure 2(b).
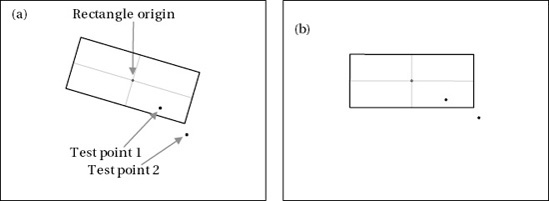
Having arranged the points as shown in Figure 2(b),
we can now perform a simple check to see whether each point is within
the left-right and top-bottom boundaries, just as we did with the
bounding box test. This is a very simple calculation and gives us
exactly the results we are looking for.
The code to perform this check is fairly
straightforward. The main focus of the calculation is to perform the
rotation of the test point around the rectangle's origin. We don't need
to actually perform any calculation on the rectangle at all; we just
need to rotate the points and then check them against the rectangle's
unrotated width and height, which is already returned to us from the BoundingBox property.
When we rotate a point in space, it always rotates around the origin—
the point at coordinate (0, 0). If we want to rotate around the
rectangle's origin, we therefore need to find the distance from the
rectangle origin to the test point. The calculation can then be
performed in coordinates relative to the rectangle, not the screen.
We can do this simply by subtracting the origin position from the test point position, as shown in Figure 3. In Figure 3(a),
we see the coordinates specified as screen coordinates—the actual pixel
position on the screen that forms the origin of the rectangle and the
user's touch points. In Figure 3(b),
these coordinates are specified relative to the rectangle origin. As
you can see, this has simply subtracted 200 from the x values and 100
from the y values because they are the rectangle's origin coordinate.
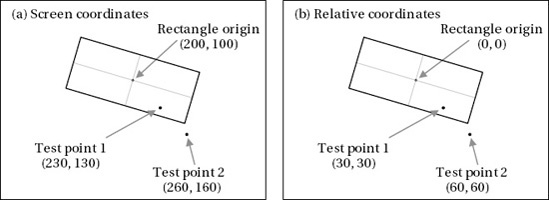
These modified coordinates are considered as being in object space rather than in the normal screen space
as they are now measured against the object (the rectangle) rather than
the screen. We can now rotate these points around the origin, and as
long as we remember that we are measuring their position in object space
rather than screen space, we will find the new positions that we saw in
Figure 2(b).
NOTE
If at any time we want to map the coordinates
back into screen space, all we need to do is re-add the rectangle's
origin that we have subtracted. If we move a point to object space (by
subtracting the object's origin coordinate), rotate it, and then move it
back to screen space (by re-adding the object's origin coordinate), we
will have rotated around the object's origin even though it is not at
the screen's origin coordinate.
Having obtained the coordinate in object space, we
now need to rotate it to match the rectangle's angle. The rectangle in
the figures we have been looking at is rotated 15degrees in a clockwise
direction. As you can see in Figure 2(b),
to reset the rectangle back to its original angle we therefore need to
rotate it back by the same angle—in other words 15 degrees
counterclockwise. We can achieve this by negating the rotation angle.
The calculation to rotate a point around the origin is as follows:
x′ = x cos θ − v sin θ
v′ = x sin θ + v cos θ
The code to perform this calculation is shown in Listing 7.
Example 7. Rotating the point variable to calculate the new rotatedPoint variable
// Rotate the point by the negative angle sprite angle to cancel out the sprite rotation
    rotatedPoint.X = (float)(Math.Cos(-Angle) * point.X - Math.Sin(-Angle) * point.Y);
    rotatedPoint.Y = (float)(Math.Sin(-Angle) * point.X + Math.Cos(-Angle) * point.Y);
|
Now we have the coordinate relative to the unrotated
object's origin. We can therefore simply move the bounding box into
object space (by once again subtracting the rectangle position) and then
see whether the point is contained within the bounding box. If so, the
point is a hit; if not, it is a miss.
Table 1 shows the calculations that we have described for each of the touch points shown in Figure 3.
The sprite in question is 64 × 64 pixels and has been scaled to be
double its normal width, resulting in a rectangle of 128 × 64 pixels.
Table 1. Calculation steps to determine whether a test point is within a rotated scaled rectangle
| | Test Point 1 | Test Point 2 |
|---|
| Screen coordinate | (230, 130) | (260, 160) |
| Object-space coordinate | (30, 30) | (60, 60) |
| Rotated coordinate | (36.7, 21.2) | (73.5, 42.4) |
| Rectangle top-left/bottom-right in object coordinates | (−64, −32) / (64, 32) |
| Point contained within rectangle | Yes | No |
As this table shows, the rotated test point 1
coordinate is inside the rectangle's object coordinates (its x
coordinate of 36.7 is between the rectangle x extent of - 64 to 64, and
its y coordinate of 21.2 is within the rectangle y extent of - 32 to
32), and the rotated test point 2 coordinate is not.
The complete function to perform this calculation is shown in Listing 8. This code is taken from the SpriteObject class, and so has direct access to the sprite's properties.
Example 8. Checking a test point to see whether it is within a rotated and scaled sprite rectangle
protected bool IsPointInObject_RectangleTest(Vector2 point)
    {
        Rectangle bbox;
        float width;
        float height;
        Vector2 rotatedPoint = Vector2.Zero;

        // Retrieve the sprite's bounding box
        bbox = BoundingBox;

        // If no rotation is applied, we can simply check against the bounding box
        if (Angle == 0) return bbox.Contains((int)point.X, (int)point.Y);

        // Get the sprite width and height
        width = bbox.Width;
        height = bbox.Height;

        // Subtract the sprite position to retrieve the test point in
        // object space rather than in screen space
        point -= Position;

        // Rotate the point by the negative angle of the sprite to cancel out the sprite
// rotation
        rotatedPoint.X = (float)(Math.Cos(-Angle) * point.X - Math.Sin(-Angle) * point.Y);
        rotatedPoint.Y = (float)(Math.Sin(-Angle) * point.X + Math.Cos(-Angle) * point.Y);

        // Move the bounding box to object space too
        bbox.Offset((int)-PositionX, (int)-PositionY);

        // Does the bounding box contain the rotated sprite?
        return bbox.Contains((int)rotatedPoint.X, (int)rotatedPoint.Y);
    }